Over the past few months, I grew increasingly frustrated with API limits, expensive subscription costs, and data privacy concerns while testing code for my B2B projects. Every time I pasted a proprietary code snippet or a confidential business logic workflow into a cloud-based chatbot, I worried about where that data was being stored. Sending sensitive enterprise data to external servers is simply not a sustainable long-term strategy for professional developers. I needed an intelligent assistant that lived entirely on my local hard drive, required zero internet connection to function, and did not cost a single dime to operate.
That is when I decided to completely shift my workflow and run local AI directly on my Windows machine. After researching several offline options, including complex Python repository clones and heavy GUI applications, I opted for a streamlined command-line tool called Ollama. It is incredibly lightweight, runs natively via the Windows Command Prompt, and downloads optimized 4-bit models in seconds. If you want to build an entirely private, zero-latency development environment on your personal computer, here is my exact step-by-step process based on real hardware testing.
(If you are also curious about how cloud-based autonomous agents perform before making the switch to offline tools, [read my previous detailed review on Devin vs Cursor AI here].)
Why B2B Developers Need an Offline LLM in 2026
Before diving into the installation, it is important to understand why running models locally is becoming the industry standard. Cloud models suffer from latency spikes during peak hours. When you are deeply focused on debugging a script, waiting ten seconds for a server response breaks your momentum. Furthermore, offline models offer uncompromised privacy. Your prompts, codebases, and hardware telemetry data never leave your room.
I wanted to ensure that my setup could rival standard cloud chatbots without melting my computer’s processor. To achieve this, I monitored my system’s hardware telemetry in real-time, verifying exactly how much computing power these modern offline models actually consume.
Hardware Requirements for Windows Execution
You do not need a massive enterprise server rack to run a capable language model today, but your baseline hardware does matter. A standard mid-range Windows machine works perfectly if configured correctly. Based on my testing, here is what you need:
-
A Windows 10 or 11 operating system.
-
At least 8GB of RAM. (During my test, the system utilized roughly 7.1GB out of a total 7.9GB available memory. Having 16GB is highly recommended to prevent background applications from stuttering).
-
A modern multi-core processor (an Intel i5 or equivalent Ryzen chip handles standard inference smoothly).
-
Around 5GB to 10GB of free disk space, preferably on a fast SSD, to store the model weights.
Step 1: Installing the Core Execution Engine
Many open-source AI projects force you to configure messy Python virtual environments, install complex dependencies, and troubleshoot Git repositories. Ollama eliminates all of this friction. It is packaged as a single, lightweight executable file.
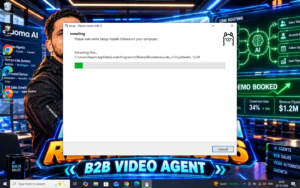
I headed over to the [official Ollama website] and grabbed the standard Windows installer. The installation process was incredibly fast, completing in less than a minute. It automatically added a system tray icon to my Windows taskbar and intelligently mapped the core commands to the Windows environment path. This meant I did not have to fiddle with advanced system settings to get my terminal to recognize the software.
To verify the installation was successful, I opened a fresh Command Prompt (CMD) window and prepared to fetch my offline model.
Step 2: Fetching the Llama 3 Brain
Once the backend utility is installed, your system needs a “brain” to actually process text and write code. These brains are Large Language Models (LLMs). I wanted a highly capable, fast, and coding-proficient offline assistant, so I decided to test Meta’s Llama 3 8B model.
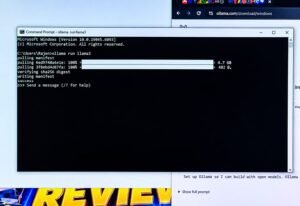
Meta has optimized this 8-billion parameter model to be incredibly efficient, and the open-source community has quantized it (compressed it) so it easily fits into standard consumer RAM. I opened my CMD window and typed this exact execution command:
DOS
ollama run llama3
The application instantly recognized my query. It began pulling the quantized model chunks directly from the secure repositories over my fiber connection. The total download size was approximately 4.7 GB. I watched the terminal as it rapidly pulled the manifest, downloaded the 100% verified SHA256 data blocks, and successfully loaded the system’s interactive prompt entirely on my local disk.
Step 3: Chatting Offline and Inspecting Real-Time Performance
With Llama 3 officially downloaded, the interactive chat session immediately launched within the CMD window, presenting a blinking cursor (>>>) waiting for my instructions.
To prove this was a truly private, offline system, I completely disabled my PC’s Wi-Fi. I needed absolute certainty that no background telemetry was communicating with external cloud servers. I typed a practical coding prompt: “Write a Python script that monitors CPU and RAM usage and print it every 2 seconds.”
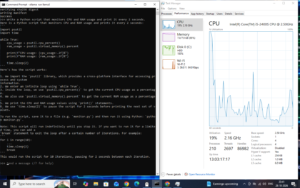
The AI began streaming back the code block by code block, directly inside the black terminal screen. To analyze the exact hardware toll, I simultaneously launched the Windows Task Manager. The results were incredibly revealing.
My memory usage spiked to 90%, with 7.1GB of RAM actively holding the Llama 3 model in its active state. The CPU utilization hovered securely around 11% at a base speed of 1.95 GHz, proving that you do not need a high-end dedicated GPU just to generate functional Python scripts. Most importantly, looking at the Wi-Fi network graph in my Task Manager, the data transmission rate sat at a flat 0 Kbps. This confirmed my prompt, my generated code, and my hardware data were 100% isolated from the internet.
Step 4: Troubleshooting Common Setup Issues
If you decide to replicate my environment, you might encounter a few minor hurdles depending on your specific Windows configuration. Here is how I recommend solving them:
-
Command Not Recognized Error: If you type the command and CMD returns an error stating the term is not recognized, simply restart your computer. Windows occasionally needs a full reboot to register newly added PATH variables.
-
Out of Memory (OOM) Crashes: If the model starts generating text but suddenly crashes, your system lacks the required RAM. Close memory-heavy applications like Google Chrome or Slack before running the inference engine.
-
Slow Generation Speeds: If the text appears one word at a time in agonizing slow motion, your system is likely relying entirely on an older CPU. Upgrading your machine to include a dedicated graphics card will offload the processing and dramatically increase the tokens-per-second output.
My Final Verdict on Desktop Machine Learning in 2026
Choosing to build a local AI environment on Windows is no longer a complex, frustrating task reserved exclusively for senior machine learning engineers. Streamlined tools like Ollama have completely democratized access to powerful open-source models like Llama 3.
While my localized terminal setup cannot completely replace massive, cloud-based enterprise pipelines required for analyzing gigabytes of raw data simultaneously, it has entirely revolutionized my daily workflow. For drafting quick Python scripts, brainstorming sensitive business workflows, and writing offline documentation, it is unmatched. You gain zero-latency responses, avoid monthly subscription traps, and permanently secure your proprietary code. If you have at least 8GB of RAM to spare, setting up an isolated offline terminal is undoubtedly the smartest technical and privacy upgrade you can make this year.
Related Posts
Qwen 2.5 vs Llama 3.1: Best Insane Local AI in 2026
Qwen 2.5 vs Llama 3.1? In the highly anticipated Qwen…

Cursor vs Zed 2026: Best Proven AI Code Editors
Cursor vs Zed 2026? In the highly debated Cursor vs…

Langfuse Review 2026: Best Ultimate LLM Observability Guide
What is Open-Source LLM Observability? In this comprehensive Langfuse Review,…