Yesterday, I took a massive step toward data privacy by completely ditching cloud-based LLMs. If you followed my previous guide on how to [run local AI on Windows], you know that setting up Ollama via the Command Prompt is incredibly efficient. It is fast, uses minimal hardware resources, and guarantees that your sensitive B2B data never touches an external server.
However, after spending an entire evening drafting Python scripts and analyzing text purely through the black-and-white CMD terminal, I hit a massive productivity wall. The command line is fantastic for backend testing, but it is terrible for daily, frictionless workflows. You cannot easily scroll back through old chats, you cannot organize conversations into folders, and you certainly cannot upload PDF documents for analysis. I needed the beautiful, user-friendly interface of ChatGPT, but I wanted it running completely offline on my own hardware.
This requirement led me down a fascinating rabbit hole, resulting in a complete graphical upgrade of my local AI environment. Today, I am sharing my hands-on case study of transforming a raw CLI model into a premium desktop application using Open WebUI.
The Problem: Why the Command Line Limits Productivity
Before implementing the solution, I documented the exact friction points I was experiencing with the raw Ollama terminal:
-
Chat History Loss: The moment you close the CMD window, your entire conversation context is wiped out. You cannot revisit a brilliant code snippet generated two hours ago.
-
No Multi-Threading: If I wanted to brainstorm a marketing strategy while simultaneously debugging a script, I had to open multiple terminal windows, which became chaotic and hard to track.
-
Zero File Attachments: Modern B2B workflows require analyzing documents. The terminal does not allow you to simply drag and drop a PDF or CSV file for the AI to read.
I realized that if I wanted to deploy this local AI to my non-technical team members in the future, handing them a black terminal screen was not going to work. I needed a web-based Graphical User Interface (GUI).
The Solution: Discovering Open WebUI
After browsing GitHub repositories and testing various frontend wrappers, I found the absolute gold standard: Open WebUI (formerly known as Ollama WebUI). It is an extensible, feature-rich, and highly polished interface that visually mimics ChatGPT almost perfectly.
What makes it highly valuable for enterprise and local deployments is that it acts as a bridge. It sits on top of your existing Ollama installation, grabs the AI models you already downloaded (like my Llama 3 8B), and presents them in a sleek web browser dashboard. However, installing it isn’t as simple as downloading a standard Windows .exe file. It requires containerization.
Phase 1: The Prerequisite (Setting Up Docker Desktop)
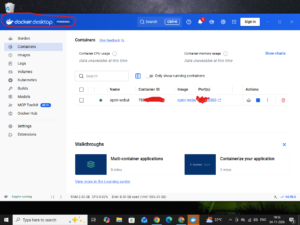
To run Open WebUI natively on Windows without dependency conflicts, it is highly recommended to run it inside a Docker container. For developers, Docker is standard territory, but if you are new to local hosting, it essentially creates a mini, isolated Linux environment on your PC just for this app.
I navigated to the official [Docker website] and downloaded Docker Desktop for Windows. During the installation, I ensured that the WSL2 (Windows Subsystem for Linux) backend was checked. WSL2 allows Docker to utilize system resources much more efficiently than legacy Hyper-V virtualization.
After a quick system restart, Docker Desktop was running quietly in my system tray. The foundation was set. I was now ready to bridge the GUI with my offline AI.
Phase 2: Deploying the Container
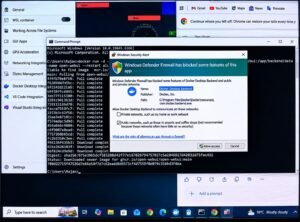
With Ollama running in the background and Docker active, I opened a fresh Command Prompt window. According to the official Open WebUI documentation, I needed to pull their official image and bind it to my local network port so my browser could access it.
Next, I just popped open Command Prompt and ran this single command to download Open WebUI:
docker run -d -p 3000:8080 --add-host=host.docker.internal:host-gateway -v open-webui:/app/backend/data --name open-webui --restart always ghcr.io/open-webui/open-webui:main
Let me break down exactly what this command did during my test:
-
-p 3000:8080: This mapped the container to my local network, allowing me to access the interface simply by typing
localhost:3000into my web browser. -
-v open-webui:/app/backend/data: This created a persistent volume. This part is crucial—it means that even if I restart my PC or update the container later, my chat history and settings won’t get deleted.
-
ghcr.io/…: This pulled the latest verified code directly from the GitHub Container Registry.
As soon as I hit enter, Docker began downloading the image chunks. Within roughly two minutes, the terminal returned a long container ID string, confirming the web interface was officially running silently in the background.
Phase 3: The “After” Experience (Testing the Interface)
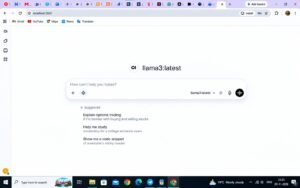
This was the moment of truth. I disconnected my Wi-Fi to maintain my strict data privacy parameters, opened Google Chrome, and typed http://localhost:3000 into the address bar.
Instantly, I was greeted by a clean, professional login screen. Because this is hosted entirely on my machine, the first account created automatically becomes the Admin account. I registered my local admin credentials and entered the main dashboard.
The transformation was incredible. I was no longer staring at a DOS-era terminal. Instead, I had a beautiful dark-mode interface with a sidebar for chat history, a settings panel, and a model selector at the top. It automatically detected the Meta Llama 3 model I had downloaded via Ollama the day before.
I immediately tested the most important feature: RAG (Retrieval-Augmented Generation). I clicked the small ‘+’ attachment icon next to the chat bar and uploaded a 5-page PDF document containing sample business logistics data. I asked the AI to summarize the cost discrepancies. Because Open WebUI has built-in embedding capabilities, it processed the local PDF and the Llama 3 model gave me an accurate, formatted summary in seconds.
Telemetry Check: Does a GUI Drain Hardware?
My biggest concern with adding a web interface and a Docker container on top of an LLM was resource consumption. Did I just ruin the lightweight nature of my local AI?
I opened the Windows Task Manager to monitor the hardware telemetry while generating a response. Surprisingly, the impact was minimal. Docker and the WebUI backend consumed roughly 400MB of RAM. The heavy lifting was still being handled cleanly by Ollama. My total RAM usage hovered around 7.6GB, and CPU utilization remained stable. The system remained highly responsive, proving that you can have a premium graphical interface without needing a $3,000 workstation.
My Final Verdict on the UI Upgrade
Building an offline AI is only half the battle; making it usable for daily B2B workflows is the other. By integrating Open WebUI via Docker, I successfully transformed a raw CLI tool into a fully functional, enterprise-grade AI assistant that lives entirely on my hard drive.
I now have permanent chat histories, customizable system prompts, multiple chat threading, and local document analysis—all with zero API costs and zero data privacy risks. If you are currently running Ollama from the terminal, taking the extra ten minutes to deploy this graphical interface is the most impactful upgrade you can execute for your personal development stack.
Related Posts
Seedance 2.0 AI Guide: The Best Directing Tutorial 2026
Why This Seedance 2.0 AI Guide is a Game-Changer Seedance…

5 Best Agentic AI Tools in 2026: Top Autonomous Assistants
The Shift to Agentic AI Tools In 2026, the digital…
16 Incredible AI Updates: Free GLM 5.2 vs Claude Fable 5
Quick Answer: The AI landscape has shifted dramatically this week.…